Arduino Uno Microprocessor Based BBQ Smoker Controller
Back Story: (You can skip this and jump to the Design, Major Components, Construction, Testing Phases , the Controller Program, Pork Butt Cookiing and More, below.)
Some years ago I bought a commercially made, Little Chief, electric cold smoker at a garage sale. It had a small electric element at the bottom of a aluminum box with a wire rack that slid down into the box and a lid to close it all up. You put a pan of hickory sawdust on the heating element, turned it on, and the dust turned to smoke. It was great for smoking salmon or beef jerky but did not have the heat to cook larger items.
Little Chief Smoker |

After a few years of use the heating element burned out. I purchased an 800 Watt electric hot plate at the local big-box store; it had a heat control knob on the front to adjust the power level and a bi-metallic strip thermostat mounted below the heating element to help maintain a constant temperature.
I took the thermostat out from below the heating element and mounted it in a small box inside my smoker and put the heating element at the bottom of the box. There I could turn the power level knob to adjust the thermostat and thus adjust the temperature inside the smoker. Since the hot plate element had a great deal more power than my previously cold smoker element, I could roughly maintain temperatures of 200 F to 250 F inside the unit with the thermostat somewhat keeping the temperature constant (within plus or minus 25 F at best). I had a pretty good BBQ smoker. I could do an 8.5 pound pork butt in about eleven hours with smoke and a nearly constant temperature of 225 to 250 F.
After a season of use the bi-metallic thermostat got gummed with smoke residue (since it was inside the smoker being subjected to smoke) and about the same time the heating element housing completely disintegrated, wiring and all; it had not been designed to be kept at 250 F inside a box; the plastic and rubber parts were nearly burned away.
I now had a 800 Watt heating element and a nice aluminum box with a matching wire rack insert. I decided I could get a few thermistors (temperature sensors) and wire them up to a microprocessor. One thermistor would give the temperature of the oven and the microprocessor could be programmed to turn the heating element on and off to maintain a more constant temperature. The other thermistor would be used to monitor the temperature of meat inside the smoker. The temperatures could be displayed on a liquid crystal display (LCD) so that I could monitor the progress of my smoker and the meat inside it.
I also wanted the microprocessor to occasionally store the temperature of the meat so I could later check its progress throughout the course of the cooking day (without having to stand around and manually record it every 15 minutes.)
After some research:
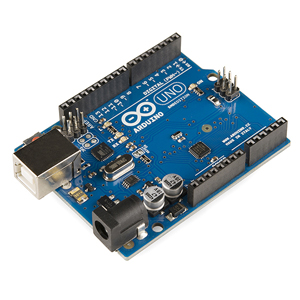
1. I bought an Arduino Uno microprocessor starter kit and learned how to wire and program the unit.
Arduino Uno |
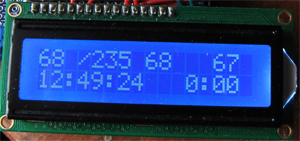
2. I had an LCD 16X2 (display unit) which I used to display time and temperatures.
|
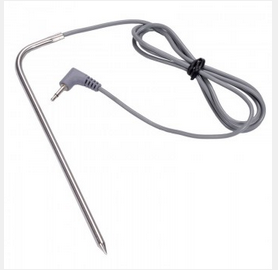
3. I bought two replacement temperature probes made for an Acurite digital cooking thermometer, model 3168P probes. Each probe consists of a thermistor mounted inside a stainless steel tube connected by a pair of long wire mesh shielded wires to a small male jack plug. I found the matching female plug at the Radio Shack. The probes were designed to work at conventional oven temperature; just what I needed.
Replacement Probe Acurite 3168P |
As the temperature of the thermistor changes its resistance changes. I connected the probe in series with a 10K ohm resistor and put 5V across them, and used my Arduino Uno to measure and display the voltage across the thermistor. Since I could not find a calibration data for these particular thermistors (i.e. resistance as a function of temperature), I was forced to calibrate them myself. Details can be found below.
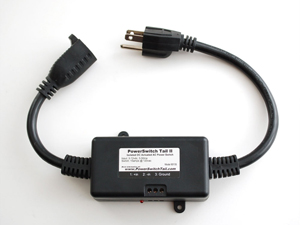
4. I bought an AC relay to control a 800 Watt heater. It is a digitally controlled relay for 117 VAC; a PowerSwitch Tail II, Model 80135.
PowerSwitch Tail II, Model 80135 |
5. I had buttons, resistors, and an LED to indicate power on or off to the heating element.
I breadboarded components in stages. First I wired and programmed the LCD 16X2, then added the two thermometer probes, and lastly added the AC relay unit. I added two buttons so I could increase or decrease the set temperature of the controller; if I wanted the smoker to be hotter or cooler I could increase or decrease the set temperature using the up button or the down button; see figure below.
I decided I would have the Arduino Uno sample the temperatures (meat temperature and interior smoker temperature) every second and display the results. Further, every 15 minutes the unit would store the temperature of the meat along with the time; thus I could later go back and read of the temperature of the meat at 15 minute interval to see how it was progressing during the course of the cooking day. In order to get all this data logging implemented and displayed I added another button, the memory button. If one presses the memory button and the up or down button, the displayed scrolled up or down through the stored time and temperature data.
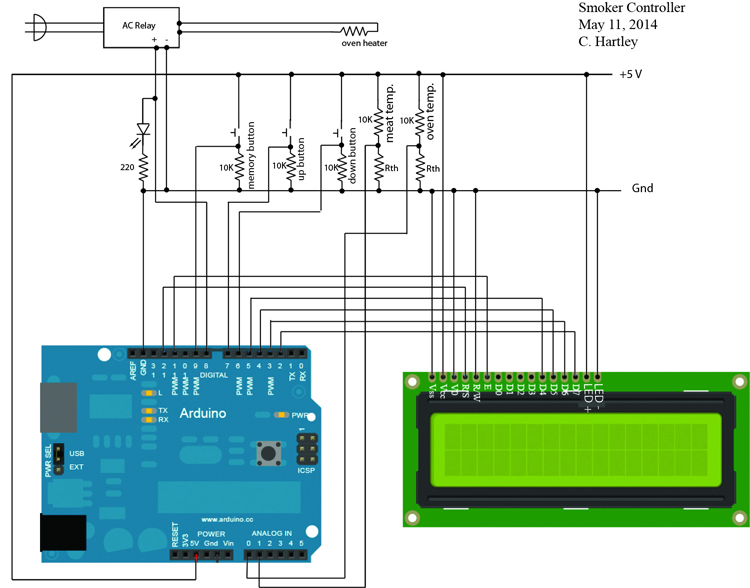
The electronic schematic is shown below: the Arduino board at the left and the LCD board at the right:
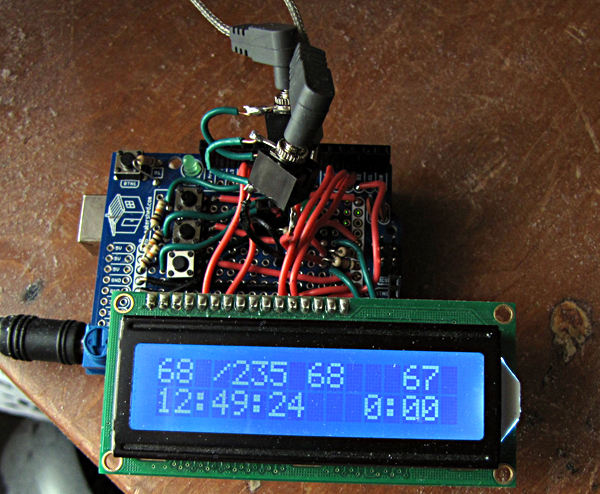
After breadboarding and testing I soldered all this onto a project shield to plug onto my Arduino Uno.
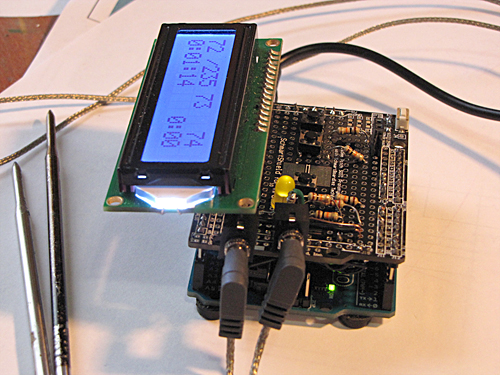
Completed Controller unit: Temperature plugs near the top and power plug at the left. There are two thin wires from the AC relay that plug into a tiny connector buried on the board--wires not shown. |
Testing & Calibrating Temperature Probes:
During the breadboard phase of construction I wired and programmed to measure the resistances of the temperature probes. The probes are thermistors, resistors with a high temperature dependence. The resistance of the probe, once calibrated, allows one to calculate the temperature of the probe. I wired and programmed the Arduino Uno to measure the voltage across the probe when in series with 10KΩ with 5V applied to the series combination.
To calibrate the probes I immersed them in a water bath and measured their resistances for various temperatures from 32 F to 212 F ( 0 C to 100 C). For this type of thermistors the temperature of the probe, T, expressed in Kelvin degrees, is approximately related to the resistance, R, by
T = 1/( a + b ln(R)),
where a and b are constants dependent upon the particular thermistor. I found for the Acurite replacement probes that a = 0.00001, and b = 0.000332. I modified the equation to find that the following formula, written in the Arduino program language, gives a much better calibration. The Kelvin temperature is given by
T = 1/(-0.0074+0.0022596*log(R) -0.0001562*log(R)*log(R)+0.0000038*log(R)*log(R)*log(R)),
and the Fahreneheit temperature is given by
Fahrenheit = (int)((T -273)*9/5+32 + 1.9).
The equation reproduces the calibration data to within ± 3 F.
I then use these formulae to convert the voltage across the thermistor, as measured by the Arduino Uno, into Fahrenheit temperature.
Testing the Controller
To check the ability of the unit to control the temperature of my smoker I connected the control unit to the AC relay, plugged the relay into an outlet and plugged my 800 watt heating unit (inside the smoker) into the relay. The smoker temperature probe was placed inside the smoker above the heating unit. I set the controller to stabilize the temperature at 225 F, and turned everything on.
The relay turned the heating unit on and the temperature (as monitored and displayed by my controller) started to rise. The controller shut the heater off after the temperature rose above 225 F, and back on once the temperature fell below 225 F. The temperature as a function of time for this turn on phase is shown in the graph below.
|
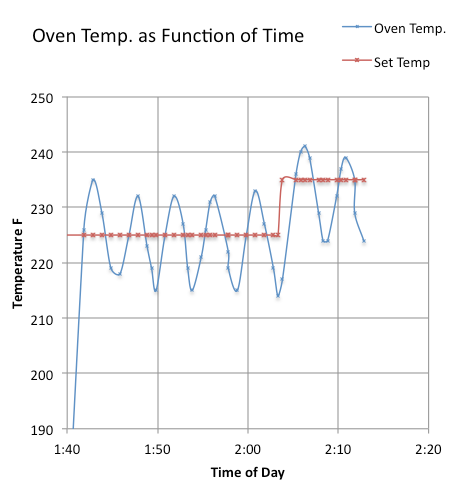
The temperature inside the smoker oscillated above and below the set temperature by about ± 8 F. I then raised the set temperature to 235 F with similar oscillating results. The oscillations occurred because of the considerable thermal mass of the 800 W heater. It was quite hot and even after being shut off continued to heat the air inside the smoker above the set point temperature. To reduce this overshoot I modified the controller program so that it somewhat anticipated this overshoot.
The final version of the controller program: Arduino Sketch
I procured an 8.5 pound pork butt, dry rubbed it, placed it inside my smoker, fired up the controller and 10 hours later, at a meat temperature of 197 F, I had a beautifully cooked moist pork butt. The controller set temperature was 255 F. For the first several hours I added moist hickory sawdust to a metal pan sitting on my heater. The pan was hot enough to have the sawdust smoke, but not burn. The temperature data are shown below.
|
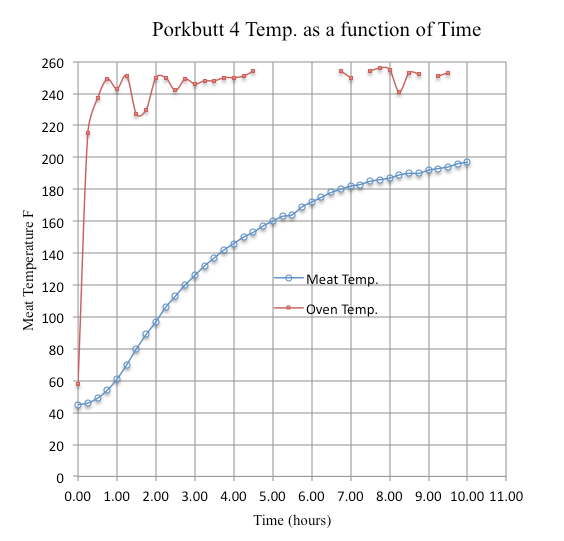
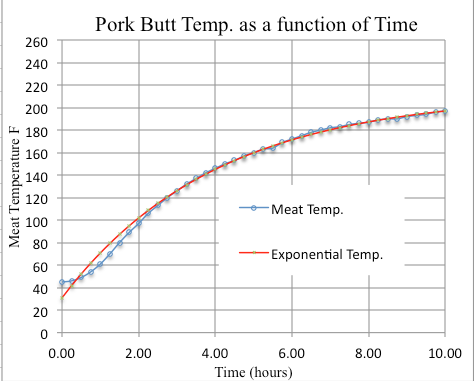
I noticed that if the smoker temperature is kept fairly constant the meat temperature rises somewhat smoothly. With a little mathematical fussing I found that the temperature after the first three hours is quite predictable. The difference between the meat temperature (measured inside the pork butt) and 212 F exponentially approaches zero as time progresses. I. e. the interior meat temperature exponentially approaches 212 F. Why 212 F? Apparently that is the surface temperature of the meat; the surface never rises much above 212 F because it is constantly evaporating water from the meat; its temperature can only rise above 212 F once the surface of the meat dries out and starts to "burn"; and apparently this does not happen when slow-cooking pork in this manner.
|
Notice there is no indication of the famous "pork butt temperature stall". I have done a number of pork butts and never experienced the famous "Stall", "Zone", or "Plateau". One physicist claims the stall is a result of evaporative cooling. This seems to imply that air circulating in the oven cools the meat, or at best keeps its temperature from rising, until it is dried out; then the stall remits and the meat temperature rises. P.S. I have a phd. in physics from the University of Colorado, and apparently little evaporative cooling (inside the oven). I do evaporative cooling in the lawn chair next to my smoker.
I have very little airflow in my smoker; I do not depend upon burning wood which needs fresh air; I do not control the temperature by blowing air into the oven. My oven temperature is controled by an electric heater. No stall, no dried out meat!!!!
The mathematics then dictates that if one takes the logarithm of the difference between 212 F and the meat temperature and plot this as a function of time, one should get a straight line, as shown below.
|

The mathematically inclined will immediately see that one can curve fit the measured data to get an equation which closely follows the measured data (shown as "calculated" in the graph). I have found that one can use the measured temperatures of the meat after the initial start-up, maybe three hours, and then predict at what time the meat reaches the desired 197 F. I have incorporated these calculations in my latest Ardunino controller program and can use it, at about five hours after the start of the cooking process, to predict the finish time of the meat to within about ± 15 minutes.
This page was prepared by Charles Hartley
Text & graphs © 2014 by Charles Hartley
![]()
![]()